Flutter 集成 uni小程序 (UniMPSDK)
又是一段成为鸽子的日子,今天我们直接来上手一把,简单聊聊如何在 Flutter 中集成并使用小程序。 在国内环境下,小程序盛行,随着功能的庞大,许多业务上也需要进行支持,帮助开发进行抽离(减少宿主 APP 频繁发版、方便形成生态、便于独立进行测试与漏洞修复等),使用者也可随需随用、用完即走。 小程序就是一些功能和场景的 “碎片”,而 APP 本身,就是支撑这些 “碎片” 运行的 “宿主”,虽然不是很喜欢小程序所带来的性能问题以及 “阉割” 版 APP 的感觉,但不可否认小程序在开发和用户的快捷场景上带来的好处。 得益于小程序的快速发展,诞生出非常多相关技术支持的公司,在 pub.dev 上其他开发者以及公司直接提供了集成插件,但为了自己能更灵活地把控程序以及担忧插件持续维护的问题,我这里选择了非常成熟的 首先我们来看看 Flutter 集成 uni小程序的效果(目前已集成 Android 和 iOS)。 uni-app 官方文档以及其他教程都是教学如何在原生平台进行集成。uni-app 自己进行集成。效果
源码示例工程(实验室-小程序):https://github.com/AmosHuKe/Mood-Example实现思路
首先我们能够知道 Flutter 和 uni-app 都是属于 UI 框架,作用于原生系统上。
UI 框架之间没有办法直接通讯,但我们可以利用原生的能力将他们两位打通。
我这里利用的是 Flutter 中 MethodChannel 的能力,它能够异步地让 Flutter 与原生平台之间的方法互相调用。
使用通道在 Flutter 和原生平台之间传递消息,如下图所示: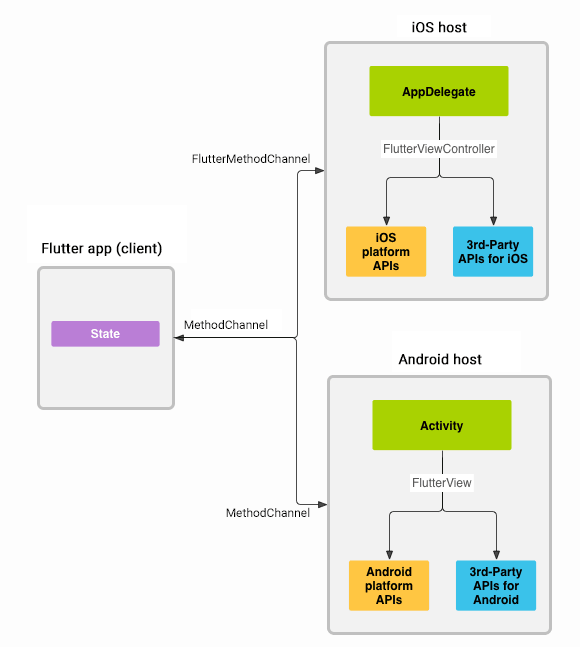
所以,我们只需要在对应的原生平台(Android、iOS)编写业务需要的 uni-app API 方法,Flutter 再通过 MethodChannel 的通道与原生平台进行通讯即可。
具体集成实现
开发环境
基础环境:
Windows
[√] Flutter (Channel stable, 3.7.3, on Microsoft Windows [版本 10.0.22000.1455], locale zh-CN)
[√] Android toolchain - develop for Android devices (Android SDK version 33.0.1)
[√] Visual Studio - develop for Windows (Visual Studio Community 2022 17.4.0)
[√] Android Studio (version 2021.3)
[√] VS Code (version 1.70.0)
macOS
[✓] Flutter (Channel stable, 3.7.3, on macOS 13.0 22A380 darwin-x64, locale zh-Hans-CN)
[✓] Android toolchain - develop for Android devices (Android SDK version 33.0.0)
[✓] Xcode - develop for iOS and macOS (Xcode 14.2)
[✓] Android Studio (version 2021.3)
[✓] VS Code (version 1.74.3)
小程序 SDK :
UniMPSDK-Android: 3.4.7.V2.20220425(当前文章主要演示 Android 实现)
UniMPSDK-iOS: 3.4.7
小程序打包基座:
HBuilderX: 3.4.7(尽量与 UniMPSDK 版本一致)
JAVA 环境: jdk1.7+(最优1.8)
Android API: 最低运行版本 21
Android UniMPSDK 集成
官方原生平台教程:uni小程序SDK Android集成教程
以下为我个人集成流程。
UniMPSDK 目录说明
├── UniMPSDK
│   ├── DEMO              # uni小程序 SDK 集成示例 DEMO
│   └── SDK               # uni小程序 SDK
│   │   ├── assets        # assets 资源文件
│   │   ├── libs          # 所有依赖库
│   │   ├── res           # 资源文件
│   │   ├── src
│   │   │   └── wxapi     # 微信分享支付需要的 activity
│   │   └── proguard.cfg  # 混淆配置
Libs 依赖库配置
Flutter 项目中位于(没有则自行创建):项目/android/app/libs/
对应 UniMPSDK 位置:UniMPSDK/SDK/libs/
Libs 文件夹依赖库可根据功能需要进行增加或删除,除视频、地图、分享、支付、登录、直播pusher 等 SDK,只集成以下基础模块就可使用:
uniMPSDK-V2-release.aar    # 必须集成
uniapp-v8-release.aar    # 必须集成
android-gif-drawable-release@1.2.23.aar    # 必须集成
base_oaid_sdk.aar    # 必须集成 注意(3.3.8版本的SDK及以下版本请集成oaid_sdk_1.0.25.aar)
sqlite-release.aar
messaging-release.aar
iBeacon-release.aar
fingerprint-release.aar
contacts-release.aar
Bluetooth-release.aar
build.gradle 配置
Flutter 项目中位于:项目/android/app/build.gradle
以下为基础配置,具体可参考 UniMPSDK 中 UniMPSDK/DEMO/app/build.gradle 文件。
android {
    defaultConfig {
        applicationId "宿主项目包名 xxx.xxx.xxxxx"
        minSdkVersion 21 // 最低支持21
        targetSdkVersion 33 // 最优26 2.8.11开始最高支持30
        ndk {
            abiFilters 'x86','x86_64','armeabi-v7a','arm64-v8a' // 不支持armeabi
        }
    }

    buildTypes {
        release {
            minifyEnabled true
            // 混淆
            proguardFiles getDefaultProguardFile('proguard-android.txt'), 'proguard.cfg'
        }
    }

    // 此处配置必须添加 否则无法正确运行
    aaptOptions {
        additionalParameters '--auto-add-overlay'
        // noCompress 'foo', 'bar'
        ignoreAssetsPattern "!.svn:!.git:.*:!CVS:!thumbs.db:!picasa.ini:!*.scc:*~"
    }
}

flutter {
    source '../..'
}

// 导入 arr 需要的配置
repositories {
    flatDir {
        dirs 'libs'
    }
}

dependencies {
    // libs UniMPSDK
    implementation fileTree(include: ['*.jar'], dir: 'libs')
    implementation fileTree(include: ['*.aar'], dir: 'libs')
    // 必须添加的依赖
    implementation 'com.android.support:recyclerview-v7:28.0.0'
    implementation 'com.android.support:support-v4:28.0.0'
    implementation 'com.android.support:appcompat-v7:28.0.0'
    implementation 'com.alibaba:fastjson:1.1.46.android'
    implementation 'com.facebook.fresco:fresco:1.13.0'
    implementation 'com.facebook.fresco:animated-gif:1.13.0'
    implementation 'com.github.bumptech.glide:glide:4.9.0'
}
assets 基础资源配置
1、将 UniMPSDK/SDK/assets 内的所有文件按目录放入 项目/android/app/src/main/assets 中(没有目录自行创建)。
2、创建 uni小程序资源文件夹:在 项目/android/app/src/main/assets/ 下创建 apps 文件夹 用于放置 uni小程序打包发行的程序。
proguard 混淆配置
将 UniMPSDK/SDK/proguard.cfg 文件放入 项目/android/app/ 中。
打包发行 uni-app 小程序
注意:仅支持 uni-app 小程序
HBuilderX 一般情况可以向下兼容 UniMPSDK 的版本,但尽量 HBuilderX 和 UniMPSDK 的版本保持一致。
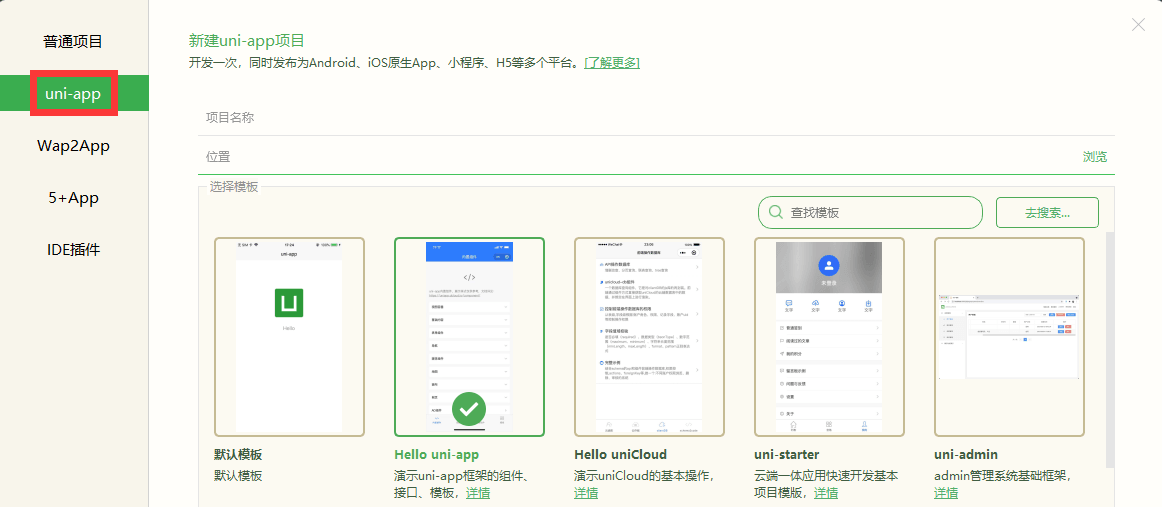
打开 HBuilderX,新建一个示例项目或者自己编写。
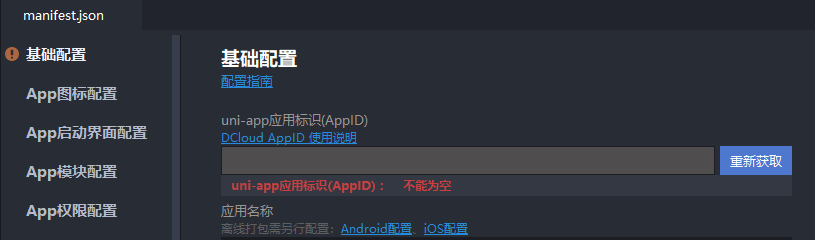
在小程序项目的 manifest.json 内获取并使用 uni-app 应用标识(AppID),也是我们之后指定操作小程序的标识。
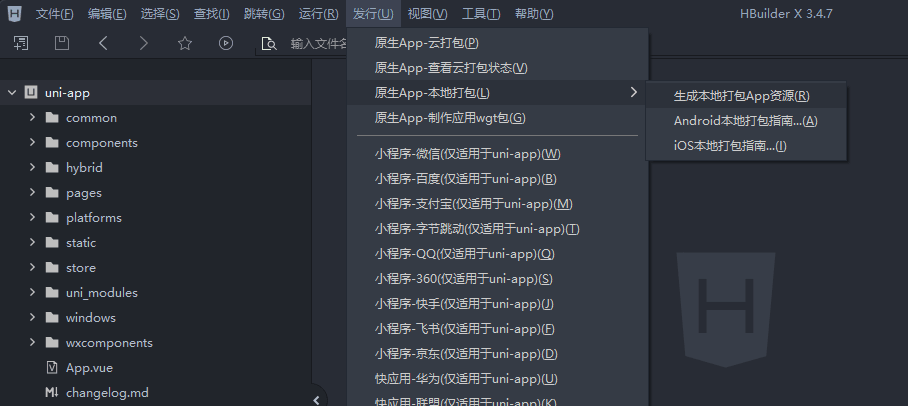
使用 【发行 => 原生App-本地打包 => 生成本地打包App资源】 生成本地包。
将打包好的内容放入 项目/android/app/src/main/assets/apps/ 内,文件结构必须如下:
├── apps
│   ├── __UNI__xxxxxxx  # 小程序1
│   │   └── www
│   │   │   └── ...     #小程序编码
│   ├── __UNI__xxxxxxx  # 小程序2
│   │   └── www
│   │   │   └── ...     #小程序编码
原生实现 MethodChannel
Flutter 项目中位于:
项目\android\app\src\main\kotlin\com\example\moodexample\MainActivity.kt
Android 端需要在 FlutterActivity 的 configureFlutterEngine 方法中获取 FlutterEngine 对象。
接着再创建 MethodChannel 通道实例,最后对通道设置 MethodCallHandler 回调。
根据我们的业务(需要调用 UniMPSDK API 打开指定的 uni小程序 并监听),创建一个名为 UniMP_mini_apps 的通道以及名为 open 的方法帮助我们操作 UniMPSDK 打开小程序。
UniMPSDK API: Android API V2版本参考手册
import androidx.annotation.NonNull;
import io.flutter.embedding.android.FlutterFragmentActivity;
import io.flutter.embedding.android.FlutterActivity
import io.flutter.embedding.engine.FlutterEngine
import io.flutter.plugin.common.MethodChannel
import io.flutter.plugins.GeneratedPluginRegistrant
import io.flutter.Log

import io.dcloud.feature.sdk.DCUniMPSDK;
import io.dcloud.feature.sdk.Interface.IUniMP
import io.dcloud.feature.sdk.DCSDKInitConfig
import io.dcloud.feature.sdk.MenuActionSheetItem
import io.dcloud.common.adapter.util.Logger

class MainActivity: FlutterFragmentActivity() {
    override fun configureFlutterEngine(@NonNull flutterEngine: FlutterEngine) {
        GeneratedPluginRegistrant.registerWith(flutterEngine);
        val messenger = flutterEngine.dartExecutor.binaryMessenger
        // Channel 对象
        val channel = MethodChannel(messenger, "UniMP_mini_apps")
        // Channel 设置回调
        channel.setMethodCallHandler { call, res ->
            // 根据方法名,分发不同的处理
            when(call.method) {
                // 打开指定的 UniMP 小程序
                "open" -> {
                    try {
                        // 接收 Flutter 传入的参数
                        val argumentAppID = call.argument<String>("AppID")
                        // 设置右上角胶囊操作菜单
                        val item = MenuActionSheetItem("关于", "about")
                        val sheetItems: MutableList<MenuActionSheetItem> = ArrayList()
                        sheetItems.add(item)
                        // 初始化uniMPSDK
                        val config = DCSDKInitConfig.Builder()
                                .setCapsule(true)
                                .setMenuDefFontSize("16px")
                                .setMenuDefFontColor("#2D2D2D")
                                .setMenuDefFontWeight("normal")
                                .setMenuActionSheetItems(sheetItems)
                                .build()
                        DCUniMPSDK.getInstance().initialize(this, config)

                        // 打开小程序
                        val unimp: IUniMP = DCUniMPSDK.getInstance().openUniMP(this, argumentAppID)
                        // 监听胶囊菜单点击事件
                        DCUniMPSDK.getInstance().setDefMenuButtonClickCallBack { argumentAppID, id ->
                            when (id) {
                                "about" -> {
                                    Logger.e(argumentAppID + "点击了关于")
                                }
                            }
                        }
                        // 监听小程序关闭
                        DCUniMPSDK.getInstance().setUniMPOnCloseCallBack { argumentAppID -> Log.e("unimp", argumentAppID + "被关闭了") }
                    } catch (e: Exception) {
                        e.printStackTrace()
                    }
                }

                else -> {
                    // 如果有未识别的方法名,通知执行失败
                    res.error("error_code", "error_message", null)
                }
            }
        }
    }
}
iOS UniMPSDK 集成
可按照示例项目说明进行实现[链接]
添加依赖库及资源文件
根据官方原生平台教程添加完成基础依赖库以及资源文件(uni小程序SDK iOS集成教程)
原生实现 MethodChannel
iOS 端通过 MethodChannel 通道,根据我们的业务(需要调用 UniMPSDK API 打开指定的 uni小程序),创建一个名为 UniMP_mini_apps 的通道以及名为 open 的方法帮助我们操作 UniMPSDK 打开小程序(通道、方法名称与 Android 实现相同,方便统一调用)。
先在 Runner-Bridging-Header.h 中引用头文件 #import "DCUniMP.h"
Flutter 项目中位于:项目\ios\Runner\Runner-Bridging-Header.h
之后在 AppDelegate.swift 中编写实现
Flutter 项目中位于:项目\ios\Runner\AppDelegate.swift
UniMPSDK iOS API: iOS API 参考手册
import UIKit
import Flutter

@UIApplicationMain
@objc class AppDelegate: FlutterAppDelegate,DCUniMPSDKEngineDelegate {
  override func application(
    _ application: UIApplication,
    didFinishLaunchingWithOptions launchOptions: [UIApplication.LaunchOptionsKey: Any]?
  ) -> Bool {
    let controller : FlutterViewController = window?.rootViewController as! FlutterViewController
    let uniMPMiniApps = FlutterMethodChannel(name: "UniMP_mini_apps",
                                             binaryMessenger: controller.binaryMessenger)
    uniMPMiniApps.setMethodCallHandler({
      [weak self] (call: FlutterMethodCall, result: FlutterResult) -> Void in
      switch(call.method) {
        case "open":
          if let arguments = call.arguments as? Dictionary<String,Any> {
            let AppID: String = arguments["AppID"] as? String ?? ""
            let options = NSMutableDictionary.init(dictionary: launchOptions ?? [:])
            options.setValue(NSNumber.init(value:true), forKey: "debug")
            DCUniMPSDKEngine.initSDKEnvironment(launchOptions: options as! [AnyHashable : Any]);
            self?.checkUniMPResoutce(appid:AppID)
            self?.openUniMP(appid:AppID)
          }
        break
        default:
          result(FlutterMethodNotImplemented)
        break
      }
    })
    GeneratedPluginRegistrant.register(with: self)
    return super.application(application, didFinishLaunchingWithOptions: launchOptions)
  }

  func checkUniMPResoutce(appid: String) -> Void {
    let wgtPath = Bundle.main.path(forResource: appid, ofType: "wgt") ?? ""
    if DCUniMPSDKEngine.isExistsUniMP(appid) {
      let version = DCUniMPSDKEngine.getUniMPVersionInfo(withAppid: appid)!
      let name = version["code"]!
      let code = version["code"]!
      print("小程序:\(appid) 资源已存在,版本信息:name:\(name) code:\(code)")
    } else {
      do {
        try DCUniMPSDKEngine.installUniMPResource(withAppid: appid, resourceFilePath: wgtPath, password: nil)
        let version = DCUniMPSDKEngine.getUniMPVersionInfo(withAppid: appid)!
        let name = version["code"]!
        let code = version["code"]!
        print("小程序:\(appid) 资源释放成功,版本信息:name:\(name) code:\(code)")
      } catch let err as NSError {
        print("小程序:\(appid) 资源释放失败:\(err)")
      }
    }
  }

  /// 打开uni小程序
  @IBAction func openUniMP(appid: String) {
    let configuration = DCUniMPConfiguration.init()
    configuration.enableBackground = true

    DCUniMPSDKEngine.openUniMP(appid, configuration: configuration) { instance, error in
        if instance != nil {
            print("小程序打开成功")
        } else {
            print(error as Any)
        }
    }
  }

  func uniMP(onClose appid: String) {
    print("小程序:\(appid) closed")
  }

  func defaultMenuItemClicked(_ appid: String, identifier: String) {
    print("defaultMenuItemClicked:\(appid) \(identifier)")
  }

  func splashView(forApp appid: String) -> UIView {
      let splashView:UIView = Bundle.main.loadNibNamed("SplashView", owner: self, options: nil)?.last as! UIView
      return splashView
  }
}
Flutter 调用打开小程序
原生部分编写完成后,在 Flutter 代码中创建一个相同的通道 UniMP_mini_apps,通过 MethodChannel 的 invokeMethod 调用通道的 open 方法,打开并监听指定的小程序。
/// 创建通道与原生沟通
const channel = MethodChannel("UniMP_mini_apps");

Future callNativeMethod(String appID) async {
  try {
    // 通过通道,调用原生代码代码的方法
    final future = await channel.invokeMethod("open", {"AppID": appID});
    // 打印执行的结果
    print(future.toString());
  } on PlatformException catch (e) {
    print(e.toString());
  }
}

/// 传入 uni-app 应用标识(AppID)打开指定的小程序
callNativeMethod("__UNI__xxxxxxx");
扩展能力
- 非内置 uni小程序集成方式:应用资源包(.wgt)可以选择从云端获取或共享文件等方式,宿主通过 uni小程序 SDK 的 API 调用 releaseWgtToRunPath 实现释放资源包集成 uni小程序。
- 扩展原生能力
- 更多依赖包内置功能模块集成
- 等等…
都可在此处查阅:uni 小程序 SDK
相关资料
转载请遵循
协议许可
本文所有内容严禁任何形式的盗用
本文作者:Amos
本文链接:https://amoshk.top/2022050801/